Friday, July 25, 2008

Link to download the Lotus Notes C++ Toolkit

I've received a few questions about where to get the lcppn30.dll file that is required by SharePoint to connect to Lotus Notes. Here's the link for reference: https://www14.software.ibm.com/webapp/iwm/web/reg/download.do?source=ESD-SUPPORT&S_PKG=CR3DNNA&S_TACT=104CBW71&lang=en_US&cp=UTF-8

You will have to register with IBM to download the file.

The version that contains the file is Lotus C++ API Toolkit Release 3.0 for Windows English US.

Thursday, March 20, 2008

When active directory users get deleted and re-created

When active directory users get deleted and re-created, even with the same user id, there's a nasty side effect. Each time they try to access their "my site", they will receive the following error:

The file exists. (Exception from HRESULT: 0x80070050)


The reason is because when active directory accounts are deleted and re-created, the SID changes. Hence, the link between the user id and his "my site" is broken. There's an interesting solution from the Microsoft Forums that provides a good technical background on the problem. However, the suggested solution involves updating the SharePoint tables which is an unsupported activity. Here's how you can get around the issue without touching the database:


1. Access the user's my site settings page
The first step would be to access the user's my site page. You could simply append "_layouts/settings.aspx" to the URL of the site. However, here's a slightly easier way to get to the page.


a. Login to the SharePoint Central Administration site and access the Shared Services Provider page.

b. On the SSP admin page, select "User profiles and properties" "View User Profiles"

c. Search for the user whose account has been deleted. Click on the profile name and select "Manage Personal Site"

That will bring you to the user's personal site's settings page.


2. Delete the user from the site collection

a. Click "People and Groups"

b. In the "Groups" section, click on the "(sitename)_Owners" group

c. Check the user and select "Actions Remove Users from Group"

Repeat (a) - (c) for each group that the user is a member of within the site collection.


d. Next, click "Site Permissions" and select "Settings Site Collection Administrators"
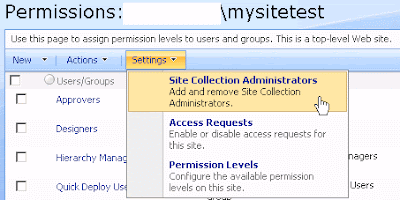


e. Add the farm account as a site collection adminsitrator. Remove the user whose account has been deleted. Click OK.


f. Back at the "People and Groups" screen, click "People" and remove the user whose account has been deleted from the list.

Effectively, we have removed the user from the site collection entirely. This will flush the link between the user and his old SID.

3. Add the user to the site collection

Now, let's add the user back to the site collection

a. Click "Site Permissions"

b. Select "Settings Site Collection Administrators"

c. Add the user as a site collection adminsitrator. Remove the farm account that was added in the previous steps. Click OK.

And the user's access to his "my site" should be restored!

Tuesday, January 08, 2008

Microsoft Small Business Specialist Primer: Your Certification Path to Success!

The latest version of the Microsoft Small Business Specialist Primer has recently been released!

An excerpt from the official website:

Description:

The "new and improved" version of our Microsoft Test Certification book. Covers Exams 70-282 and 70-631.

Based on our previous exam cram, this book has been updated, using tips and tricks from the original release, deep dive information from the "70-282 Exam Update Guide" and then some!

NEW! 70-631 - Three chapters in the book also cover the Microsoft exam: TS: Windows SharePoint Services 3.0, Configuring written by Mei Ying Lim, a SharePoint MVP in Singapore.

Release Date: December 15, 2007


When Beatrice asked me to help with the chapters for the WSS exam, I did not believe that all that material could be covered in three chapters. However, looking at the material versus what was required in the examination, I was convinced. If you are looking for a fast way to get all the information you require to pass 70-631: TS: Windows SharePoint Services 3.0, Configuring, then this is the book for you!

It condenses what you need to know for the exam in easy to digest bits. Plus it links to relevant sites on the internet if you need to deep-dive into specific areas. Its a no nonsense primer on getting you up to speed on 70-631 in the shortest time possible.

Order it now!

A brand new year, a brand new start

If I was Hiro Nakamura and teleported myself back to the start of 2007, I would still find it impossible to predict how the year would end. 2007 was a year of twists, turns and curveballs that led to an unpredictable series of events.

For starters, I've left Avanade. My new job is with a local investment company. Will I miss the world of consulting? Probably. Will I consider going back to that line of work? Maybe. But until then, I will settle for what I have now, which is considerable more time to persue personal projects. From little things like teaching the dog to fetch the papers,picking up new cooking recipes to catching Martha Stewart on TV (oops! Did I just 'fess up on that?). In my previous job, I just wasn't able to find the time to enjoy the simple pleasures of life. Time was flying by too fast. June felt like March and November felt like April. I guess it was just time to do things a little differently to achieve a different result. Thanks to everyone who helped with the job search. Next round of drinks will be on me :-)

I've also been renewed as an MVP! Its definitely a great honour to be part of this wonderful program. I've learnt a lot from the community. This year, I hope to give back a lot more than I've taken from it. Its great to work with a product like SharePoint. Kinda like being part of a worldwide movement but for computers and tech geeks. Plus, in the coming future, I'm going to be looking at it seriously from the viewpoint of an end-user. Will I feel the same way about SharePoint after that? We'll see :-) But I'll definitely still be running my own mini-code projects. You can take the geek away from a computer but you can't take the computer away from the geek.

2008 is going to be an exciting year. I just know it!

Thursday, October 25, 2007

Programatically Organizing Web Parts in a Gallery

The other day we were given the challenge of organizing web parts for "my site" site collections.


The interesting thing about "my sites" is that they are created on the fly, which rules out the option of manually organizing the web parts.


We could deploy a feature that adds web parts to the gallery by provisioning the *.dwp and *.webpart files. However, there doesn't seem to be an easy way to delete existing web parts that the customer wishes to hide from the list.


So what we did eventually was to manage the list through code. Using a similar technique described in the article, Customizing MOSS 2007 My Sites within the enterprise, we ran a script to organize the web parts within each "My Site" web part gallery. The script essentially performs the following steps:

a. Get an instance of the web part gallery
b. Deletes all web parts in the gallery
c. Adds only the required web parts to the gallery.


And of course, it runs only once, when the site is created.


Getting an instance of the web part gallery

The first step in process is to get an instance of the web part gallery. Simply get an instance of the list named "Web Part Gallery" from the root web site.

Dim webPartGallery As SPList = SPContext.Current.Site.RootWeb.Lists("Web Part Gallery")


Deleting all web parts in the gallery

Next, we web ahead to delete all web parts in the list. Well, we could have skipped this step. But in our case, the requirement was to completely change the way the web parts were listed, so it didn't make much sense to keep the existing structure.

Dim webPartsCount As Integer = webPartGallery.ItemCount
Dim arrWebParts As New ArrayList()
For i As Integer = 0 To webPartsCount - 1
arrWebParts.Add(webPartGallery.Items(i).ID)
Next


For Each webPartId As Integer In arrWebParts
webPartGallery.Items.DeleteItemById(webPartId)
Next

webPartGallery.Update()


Adding web parts to the gallery

Finally, we add web parts to the gallery. To do so, we create SPFile objects and upload them to the "/_catalogs/wp/" folder.


The idea is to build a string for the web part description file (*.dwp or *.webpart) and load it as a byte array to the folder. In this example, we create a method that builds up a *.dwp file.

Private Sub AddWebPartToGallery(ByVal assembly As String, ByVal typeName As String, ByVal title As String, ByVal description As String, ByVal partImageLarge As String, ByVal partImageSmall As String, ByVal web As SPWeb, ByVal webPartUrl As String, ByVal group As String, ByVal quickAddGroup As String)

Dim sb As New StringBuilder()

Dim sb As New StringBuilder()
sb.Append("")
sb.Append("<webpart xmlns="">")
sb.Append("<assembly>" + assembly + "</assembly>")
sb.Append("<typename>" + typeName + "</typename>")
sb.Append("<title>" + title + "</title>")
sb.Append("<description>" + description + "</description>")
sb.Append("<partimagelarge>" + partImageLarge + "</partimagelarge>")
sb.Append("<partimagesmall>" + partImageSmall + "</partimagesmall>")
sb.Append("<chrometype>TitleOnly</chrometype>")
sb.Append("</webpart>")


Dim file As SPFile = web.Files.Add("_catalogs/wp/" + webPartUrl, New System.Text.UTF8Encoding().GetBytes(sb.ToString()), True)
file.Properties("Group") = group
file.Properties("QuickAddGroups") = quickAddGroup
file.Update()
web.Update()

End Sub


What's nice about it is that you could also supply information about the Group and quick add groups as well. Which means you get to manage how the web parts are displayed in the web part gallery picker.


We could easily create a smiliar method that handles *.webpart files.

Here's an example that calls the AddwebPartToGallery() method to add a summary link web part to a custom group, "My Stuff".

AddWebPartToGallery("Microsoft.SharePoint.Publishing, Version=12.0.0.0, Culture=neutral, PublicKeyToken=71e9bce111e9429c", "Microsoft.SharePoint.Publishing.WebControls.SummaryLinkWebPart", "Summary Link Web Part", "Use to display links on your web page that can be grouped and styled and can be organized by dragging and dropping.", "/_layouts/images/webpart.gif", "/_layouts/images/webpart.gif", rootWeb, "SummaryLink.dwp", "My Stuff", "My Stuff")

And the end result of running the script is a web part gallery picker page that contains only the summary links web part in a category named, "My Stuff".


I'm a Charter Member for SharePoint:Configuring!

A pleasant surprise came through the mail the other day. I received a certificate for one of the SharePoint exams I took last year. It says that I am a Charter Member for the MCTS: SharePoint:Configuring exam. I don't really know what being a charter member really means, but it sounds really cool! It really made my day :-)

Friday, June 22, 2007

File or arguments not valid for site template

I was trying to use stsadm to create a SharePoint 2007 site collection using the createsiteinnewdb operation. I specified the site template name using the -sitetemplate switch but I kept getting the following error:

File or arguments not valid for site template [template name]

Here's the full command I was using:

stsadm -o createsiteinnewdb -url http://someurl/ -sitetemplate "publishing portal"

Turns out that silly me was supplying the template's display name and not its system name. So in order for the command to work correctly, I should have used "blankinternetcontainer#0" instead of "publishing portal". Where "blankinternetcontainer" is the name of the site definition and "0" is the configuration to be used.

stsadm -o createsiteinnewdb -url http://someurl/ -sitetemplate "blankinternetcontainer#0"

A quick way to get a list of template names is to navigate to the following page :http://website/_layouts/templatepick.aspx. Right-click on the page, view the source and pick out the name of the template from the values of the list items.

Friday, April 27, 2007

Content Management for SMB


SMB Nation has published an article I've written about SharePoint in its April edition. Its titled "Content Management for SMB" (Small and Medium businesses). It gives a quick overview about the SharePoint's coolest content management features.

Get a copy of the magazine at your nearest magazine stand. And if you are a Microsoft Small Business Specialist, sign up for a free subscription!

Tuesday, March 13, 2007

Exploring the Properties of the HTML Editor Field Control

I was trying to figure out the easiest way to hide/show buttons on the HTML Editor Field Control.

Strangely, there's some documentation on the topic but it doesn't go into the details about the buttons.

I thought I'd write about the results of my little experiment. The following tabulates the buttons that get activated/deactivated when specific properties are turned on/off.


PropertyValueButtons Activated
(Default)
  • Cut
  • Copy
  • Paste
  • Undo
  • Redo
  • Left-to-right
  • Right-to-left
  • Remove Inline Styles
  • Help
  • Select
  • Apply Paragraph Format - Normal

AllowFonts
DisableBasicFormattingButtons
True
False
  • Font
  • Font Size
  • Text Color
  • Text Highlight Color
  • Align Left
  • Center
  • Align Right
Allow HeadingsTrue
  • Apply Paragraph format
    • Address
    • Heading 1
    • Heading 2
    • Heading 3
    • Heading 4
    • Heading 5
    • Heading 6
AllowHtmlSourceEditingTrueEdit HTML Source
Allow Hyperlinks
AllowExternalUrls
True
True
  • Insert/Edit Hyperlink (allows external URLs as well)
  • Remove Hyperlink
Allow Hyperlinks
AllowExternalUrls
True
False
  • Insert/Edit Hyperlink (allows only internal URLs)
  • Remove Hyperlink
AllowImagesTrue
  • Insert/Edit Image
Allow ListsTrue
  • Numbered Lists
  • Bulleted Lists
  • Apply Paragraph Format
    • Bulleted List
    • Definition
    • Definition Term
    • Directory List
    • Menu List
    • Numbered List
AllowReusableContentTrue
  • Insert Reusable Content
AllowTablesTrue
  • Insert Table
  • Edit Table
  • Show/Hide Gridlines
  • Table Operations
  • Merge Cell
  • Change Column Width and Row Height
AllowTextMarkup
DisableBasicFormattingButtons
True
True
  • Apply Paragraph Format -Formatted
AllowTextMarkup
DisableBasicFormattingButtons
True
False
  • Apply Paragraph Format -Formatted
  • Bold
  • Italics
  • Underline
  • Align Left
  • Center>
  • Align Right
  • Decrease Indent
  • Increase Indent
DisableCustomStylesFalse
  • Styles

There's an additional property, DisableBasicFormattingButtons, which as the name suggests, disables basic formatting buttons. And these are the buttons it considers "basic:

PropertyValueButtons Deactivated
DisableBasicFormattingButtonsFalse
  • Font Size
  • Font
  • Bold
  • Italics
  • Underline
  • Align Left
  • Center
  • Align Right
  • Decrease Indent
  • Increase Indent
  • Text Color
  • Text Highlight Color